
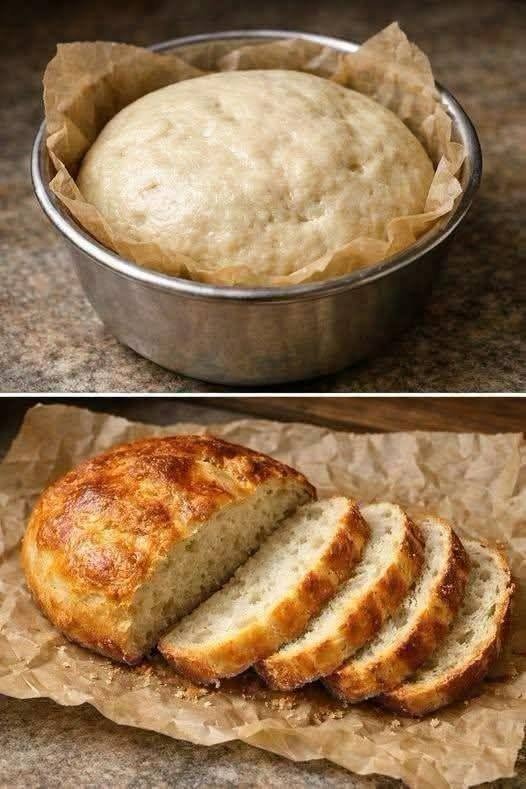
# Homemade No-Knead Crusty Bread Recipe
Easy homemade artisan bread with a crispy, golden crust and a soft, airy inside — no kneading, no mixer, and no special bread-making skills needed.
Preparation time: 10–15 minutes Rising time: 8–18 hours Baking time: 40–45 minutes Yield: 1 medium loaf
## Ingredients
– 3 cups (375 g) all-purpose flour or bread flour
– 1½ cups (355 ml) lukewarm water
– ¼ teaspoon instant yeast
– 1½ teaspoons salt
– 1–2 tablespoons extra flour, for shaping if needed
## Detailed instructions
### Step 1: Mix the ingredients
1. Take a large mixing bowl.
2. Add the flour, salt, and instant yeast. Mix well with a spoon.
3. Pour in the lukewarm water gradually.
4. Stir with a wooden spoon until all the flour is wet and a rough dough forms.
The dough should be sticky and shaggy, not smooth like kneaded bread dough. If you see a few lumps, that is perfectly fine.
Important: Do not add extra flour just because the dough feels sticky. Sticky dough helps create a soft, airy crumb.
### Step 2: Let the dough rise overnight
1. Cover the bowl with plastic wrap, a lid, or a clean kitchen towel.
2. Leave it at room temperature for 8–18 hours.
3. When ready, the dough should have risen, contain bubbles, and look soft and stretchy.
If your kitchen is warm, start checking after 6–8 hours. The dough does not need to double exactly, but it should look noticeably expanded and bubbly.
For the best flavor, mix the dough in the evening and bake it the next morning.
### Step 3: Shape the dough
1. Sprinkle a little flour on a clean work surface.
2. Gently scrape the dough out of the bowl.
3. Sprinkle a little flour over the dough to make it easier to handle.
4. Fold the edges inward toward the center about 4–6 times.
5. Turn the dough over and gently shape it into a round loaf.
Do not knead the dough or press out all the air. Handle it gently to preserve the bubbles that formed during rising.
Place the dough on baking paper, cover it with a clean towel, and let it rest for 30–45 minutes.
### Step 4: Preheat the oven and pot
For the crispiest crust, use a Dutch oven or a heavy oven-safe pot with a lid.
1. Put the empty pot and lid inside your oven.
2. Preheat the oven to 230°C (450°F).
3. Allow the pot to heat for approximately 30 minutes.
Be careful when handling the hot pot. Use oven mitts, and make sure the pot, lid, and handles are rated for this temperature.
### Step 5: Bake the bread
1. Carefully remove the hot pot from the oven.
2. Lift the dough using the baking paper and place it inside the pot.
3. Cover with the lid.
4. Bake for 30 minutes covered.
5. Remove the lid carefully.
6. Bake for another 10–15 minutes uncovered, until the crust is deep golden brown.
The covered baking stage traps steam, helping the loaf expand and develop a crisp crust. The uncovered stage browns the outside.
If you prefer a darker, crunchier crust, bake uncovered for a few additional minutes while watching carefully.
### Step 6: Cool the bread properly
Remove the loaf from the pot and transfer it to a wire rack.
Let it cool for at least 45–60 minutes before slicing. The inside continues to set as it cools, so cutting it too early can make the bread gummy.
## How to make it without a Dutch oven
You can still make this bread with an ordinary oven and baking tray.
1. Preheat the oven to 230°C (450°F) with a sturdy baking tray or baking stone inside.
2. Place the shaped dough on baking paper.
3. Transfer it carefully onto the hot tray.
4. Put a separate metal tray on the lower rack and carefully pour in a cup of hot water to create steam.
5. Bake for approximately 35–45 minutes, until the loaf is golden and sounds hollow when tapped underneath.
Keep your face and hands away from the steam. Never pour water onto the oven floor or into a glass dish.
## Troubleshooting: common bread problems
| Problem | Likely reason | Solution |
| — | — | — |
| Bread is dense | Dough did not rise enough | Allow more rising time |
| Dough is too sticky to shape | High hydration | Use lightly floured hands and a scraper |
| Crust is pale | Not enough uncovered baking | Bake longer uncovered |
| Inside is gummy | Bread was sliced too early | Cool for at least 45–60 minutes |
| Dough rises and then collapses | It over-fermented | Shorten the rising time next time |
| Crust becomes soft after cooling | Moisture trapped during storage | Cool fully on a wire rack |
## Storage instructions
– At room temperature: Store in a paper bag or bread box for 1–2 days.
– To refresh the crust: Heat in a 180°C oven for 5–10 minutes.
– For longer storage: Slice the cooled loaf, place it in a freezer-safe bag, and freeze for up to 3 months.
My best tip: The secret to this recipe is the long rise and the very hot covered pot. You do not need to knead the dough at all to get a rustic loaf with a crunchy crust and a soft, chewy center.
